
Hosted VICIdial Demo with sip phones
If the phone number you gave us at registration is amongst 35 low cost destinations, you will receive a call on that number when you login as an agent. If not, you must use a SIP phone to take the demo. This tutorial briefs you on how to use the Hosted VICIdial Demo with a SIP phone. It will make most sense to someone who has some experience operating a predictive / auto dialer.
I have split it into 4 sections. Section 2 and 3 will help you get up and running with using Hosted VICIdial Demo.
1. Things already configured
2. Things to be done
3. Start operating the Hosted Dialer
4. Sign up
After you register for the dialer demo and log into your VICIdial server, you will find that most of the activities you need to perform as a VICIdial administrator are already done for you. Details are as follows:
There are just 2 things you need to do to run your VICIdial server demo:
Please note that you can also modify your campaign settings if you want to, but mostly it would not be required. Modifying campaign settings is described later in this section.
2.1 Steps to configure softphone.
For this tutorial we use the X-Lite softphone. Any other softphone should work just fine. (Update: video tutorial of this) Steps involved are as follows:
2.1.1. Download X-Lite from here and install it.
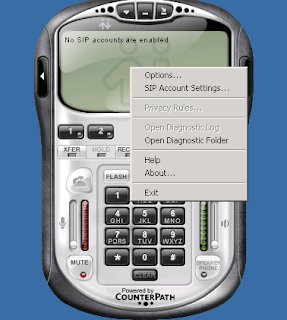
2.1.2. Start X-Lite. Right click on the phone and select 'options' menu. Then goto 'Advanced settings' --> 'Audio codecs' section, disable all codecs except speex.
Pictorial view
 View image in larger window
2.1.3. Register to VICIdial. Right click on the phone, select 'SIP Account settings' then click on ADD to configure your SIP phone.
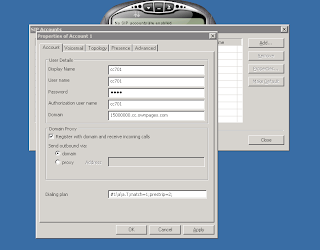
Eg below shows phone cc701 being configured. Password and domain will be provided to you when you register for the demo.
Enter following details.
Pictorial view
 View image in larger window
Click on apply and the softphone will automatically register with the server provided you enter correct details.
2.2 Uploading leads into the default campaign
For uploading leads, first create a list, assign it to the default campaign then upload leads into that list.
Login as Administrator and click on 'lists'. Click on create a new list.
Options provided are
 View image in larger window
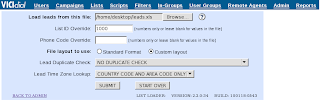
After list is created, upload leads into it.For uploading leads click on 'lists'. Click on Load new leads.Leads file should be in .xls,.csv or plain text format. See sample leads file. This file can actually be used to test the dialer.Enter following details in the list-loader page.
 View image in larger window
Clicking on submit button opens up a new page, select matching VICIdial columns against your lead file columns and click on 'ok to process'. Pictorial view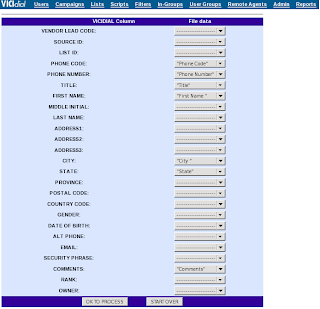 View image in larger window
After submitting, it displays a message about the status of your leads.In ideal case it should display a message as GOOD: n-1 BAD: 1 and TOTAL: n where n is the no of entries in your leads file. The GOOD and BAD entries depends upon the quality of your leads file. Pictorial view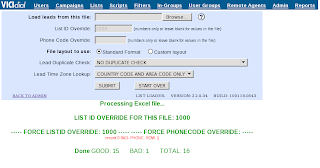 View image in larger window
If quality of the leads file is good and you have followed the above mentioned procedure, leads will be uploaded into the campaign after one minute. 2.3 Modify campaign settings if needed.E.g. To modify your dialing method for your campaign:
 View image in larger window
3. Enter web interface phone login name and password. Pictorial view View image in larger window
4. Enter Agent-id and password and select campaign to log into. Pictorial view View image in larger window
5. After submitting you would be redirected to VICIdial console from where you can start making/receiving calls. If your campaign is set to manual dialing then click on 'DIAL NEXT NUMBER' to start dialing from the leads or click on 'RESUME' if campaigns dial method is set to ratio. Pictorial view View image in another window
6. To finish a call, click on 'HANGUP CUSTOMER'. It will redirect you to disposition page, there you can enter the outcome of the call and click on submit. Pictorial view View image in another window
After clicking on submit, you will be redirected back to the VICIdial console where you can start making new calls.
As a security measure, your calling is limited to 35 low cost destinations. contact us via the forums after sign up if you want to call other destinations.
I have split it into 4 sections. Section 2 and 3 will help you get up and running with using Hosted VICIdial Demo.
1. Things already configured
2. Things to be done
3. Start operating the Hosted Dialer
4. Sign up
1. Things already configured
After you register for the dialer demo and log into your VICIdial server, you will find that most of the activities you need to perform as a VICIdial administrator are already done for you. Details are as follows:
- Agents/Phones login: 10 Agents are already created. Agent login start from agent-id 7771 to 7780 with password same as agent-id. 10 Phones are created with username cc701 to cc710 and password provided to you when you register for the hosted dialer demo. Phone username and password go into the softphone for registering them to the VICIdial server (described below). When the agent logs in to his web interface, he is asked for the phone login and password. For security reasons these are different from the phone username and password put into the softphone; agents need to use phone login from 701 to 710 with password same as phone login.
- Campaign: A default campaign named 'Campaign 01' is already created for you. The campaign is set to manual dialing.
- Carrier: A carrier is a VoIP trunk provided by the VoIP service provider to route your incoming/outgoing calls. For the hosted dialer demo we have already configured a VoIP trunk (carrier) for you.
2. Things to be done
There are just 2 things you need to do to run your VICIdial server demo:
- Configure softphones.
- Upload leads into the default campaign.
Please note that you can also modify your campaign settings if you want to, but mostly it would not be required. Modifying campaign settings is described later in this section.
2.1 Steps to configure softphone.
For this tutorial we use the X-Lite softphone. Any other softphone should work just fine. (Update: video tutorial of this) Steps involved are as follows:
2.1.1. Download X-Lite from here and install it.
2.1.2. Start X-Lite. Right click on the phone and select 'options' menu. Then goto 'Advanced settings' --> 'Audio codecs' section, disable all codecs except speex.
Pictorial view
 View image in larger window
2.1.3. Register to VICIdial. Right click on the phone, select 'SIP Account settings' then click on ADD to configure your SIP phone.
Eg below shows phone cc701 being configured. Password and domain will be provided to you when you register for the demo.
Enter following details.
- Display name: cc701
- Username: cc701
- Password: abcxyz (will be provided on registering for demo)
- Authorization user name: cc701
- Domain: 1234.cc.ownpages.com (will be provided on registering for demo)
- Domain proxy section: Select 'Register with domain and receive incoming calls' and 'Send outbound via domain'.
Pictorial view
 View image in larger window
Click on apply and the softphone will automatically register with the server provided you enter correct details.
2.2 Uploading leads into the default campaign
For uploading leads, first create a list, assign it to the default campaign then upload leads into that list.
Login as Administrator and click on 'lists'. Click on create a new list.
Options provided are
- List ID: Unique list ID.
- List Name: List name between 2 to 20 characters.
- List Description: Something descriptive (optional).
- Campaign: This list belongs to the selected campaign.
- Active: Select Y option.
- List ID: 1000
- List Name: USERS_UK
- List Description: Users in UK.
- Campaign: Campaign 01
- Active: Y
 View image in larger window
After list is created, upload leads into it.For uploading leads click on 'lists'. Click on Load new leads.Leads file should be in .xls,.csv or plain text format. See sample leads file. This file can actually be used to test the dialer.Enter following details in the list-loader page.
- Load leads from this file: Browse your leads file and upload it.
- List ID Override: Enter List Id of list which you just created.
- Phone Code Override: Leave blank
- File layout to use: Choose 'Custom layout'
- Leave rest of the options to default value.
 View image in larger window
 Clicking on submit button opens up a new page, select matching VICIdial columns against your lead file columns and click on 'ok to process'. Pictorial view
 View image in larger window
 After submitting, it displays a message about the status of your leads.In ideal case it should display a message as GOOD: n-1 BAD: 1 and TOTAL: n where n is the no of entries in your leads file. The GOOD and BAD entries depends upon the quality of your leads file. Pictorial view
 View image in larger window
If quality of the leads file is good and you have followed the above mentioned procedure, leads will be uploaded into the campaign after one minute. 2.3 Modify campaign settings if needed.E.g. To modify your dialing method for your campaign:
- login as VICIdial administrator.
- Click on campaigns. Select the campaign whose setting you want to change.
- Change 'Dial Method' to RATIO, and 'Auto Dial Level' to something greater than zero.
- Click on submit.
3. Start operating a Hosted Dialer
Now that your Agents are created, phone logins configured, campaign created and leads uploaded into it, lets see how you can start using the hosted VICIdial server.Section below shows the series of steps that the Agent performs to login into the VICIdial web console and start making/receiving calls. Steps are followed by the screen shots wherever needed.Demonstration given below is for Agent 7771 logged into phone extension cc701. i.e- Agent with agent-id 7771 and password 7771.
- Phone extension cc701.
- Web interface phone login 701 and password 701.
- Campaign name "CAMP1 - Campaign 01".
- VICIdial server address 1555000000.cc.ownpages.com.
 View image in larger window
3. Enter web interface phone login name and password. Pictorial view
 View image in larger window
4. Enter Agent-id and password and select campaign to log into. Pictorial view
 View image in larger window
5. After submitting you would be redirected to VICIdial console from where you can start making/receiving calls. If your campaign is set to manual dialing then click on 'DIAL NEXT NUMBER' to start dialing from the leads or click on 'RESUME' if campaigns dial method is set to ratio. Pictorial view
 View image in another window
6. To finish a call, click on 'HANGUP CUSTOMER'. It will redirect you to disposition page, there you can enter the outcome of the call and click on submit. Pictorial view
 View image in another window
After clicking on submit, you will be redirected back to the VICIdial console where you can start making new calls.
4. Sign-up
The demo above has a daily limit, after which the server will automatically shut down. However, your account will automatically be credited with demo credit after a few days, when you can resume your experimentation. Do not go beyond a single agent when in demo mode.Signing up after the demo is also easy. Start depositing money into your prepay account, details of which are sent in the email when you register for the demo. You do not have to use OwnPages minutes in production. The first payment must be of USD200 by PayPal. This will not appear immediately in your account till we cross check with you. Subsequent payments will be immediately credited. On first payment the demo server above will automatically be converted to production.As a security measure, your calling is limited to 35 low cost destinations. contact us via the forums after sign up if you want to call other destinations.